Wednesday, March 31, 2010

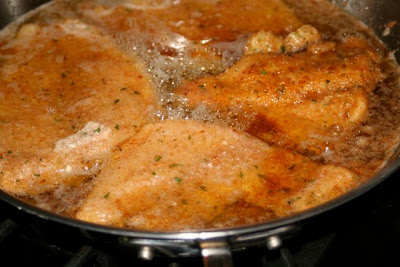
Black cherry balsamic glazed chicken

I found this recipe in my Cooking Light cookbook and knew in a heartbeat that this would become a go-to recipe.  The ingredients are simple, the prep and cooking are fast, and the finished product looks and tastes impressive.  A great choice for last-minute dinner guests or if you just want something that feels a little further removed from your family's traditional fare.

The original Cooking Light recipe calls for seedless raspberry preserves.  I didn't have any so I used black cherry instead.  You can actually substitute just about any flavor you like.  This is one of those can't-miss recipes!

Here's what you need:

Your choice of non-stick cooking spray or olive oil (to lightly coat the skillet)
1/2 chopped red onion
1 1/2 teaspoons minced fresh or 1/2 teaspoon dried thyme
1/2 teaspoon salt, divided
4 (6 ounce) skinless, boneless chicken breast halves
1/3 cup black cherry preserves
2 tablespoons balsamic vinegar (use red wine vinegar...or red wine!...if you don't have balsamic)
1/4 teaspoon black pepper


I will tell you up front, I don't measure the salt and pepper, I have a heavy hand with the balsamic, and I may have used more than the suggested 1/2 teaspoon of thyme.  I usually go by look and smell...and sometimes taste, when I make these sorts of recipes.  Unless you are a timid cook, I say let loose and experiment.

Here's how you put it all together:

Using your choice of cooking spray or olive/vegetable oil, saute your onions for five minutes over medium-high heat.  Combine thyme plus half of the salt and sprinkle this over the raw chicken breasts.

Add the chicken to the pan with the onions and saute approximately six minutes per side or until done.  The breasts should be a nice golden brown.  Remove the chicken from the pan and keep warm.  A foil covered plate or serving dish will suffice as you're nearly finished anyway.


Reduce the heat under the pan to medium-low.  Add the remaining ingredients to the pan, stirring constantly until the preserves liquefy.  This deglazes the pan and picks up all that yummy chicken flavor. 


Spoon the mixture over the chicken breasts and serve!


Super simple and so impressive!  I served mine with rice and asparagus but the possibilities are only as limited as the ingredients you have on hand.

I think I might try this again using some of my mother's homemade pepper jelly and serve it with polenta and a salad.  I'll be curious to hear about the variations you come up with, too!

Tuesday, March 30, 2010

Green smoothies

Recently I started experimenting with our smoothies. I want my older daughter, who is dairy-free, to have more calcium in her diet from food (not supplements).

Somehow I stumbled onto the idea of Green Smoothies. These are very popular among people who are on a raw food diet, but truly would be a wonderful addition to any person's diet.

The concept of a green smoothie is pretty simple: leafy green vegetables blended with fruit into a smoothie. Many green smoothies are actually green in color, but I found that when strawberries are in it, that overpowers the green. Especially if the leafy green is spinach. When I use kale, the smoothie looks more brown.

Do you think this sounds gross yet? I promise you, it's not. With both spinach and kale (the only two greens I've tried so far), there is no taste difference.

The truth of that can be seen in the fact that my 5 year old daughter will drink it down and ask for more. And she knows there is a leafy green in it, I didn't try to hide that fact.

There are, I'm sure, a million different leafy green and fruit combos you can try. Someone recommended swiss chard, an apple and orange juice saying it was divine (but definitely green).

I have used kale with strawberries or mixed berries (frozen) and bananas, and I've used spinach with the same and added fresh pear as well.

For my part, I decided to start with what I know the girls will drink: strawberry and banana smoothie. At first, I added just one leaf of kale. Then two, and now it's up to three leaves which is roughly two 1 1/2 to 2 cups.

And truly, my daughter doesn't care. She adores these smoothies. My younger daughter - not so much. But she never was a big smoothie drinker in the first place.

I start by blending the kale first with 1/4 cup of milk (we use rice). Then add in the frozen strawberries, then the banana. There's no real recipe here - just make your smoothie the way you normally do, but use a little less fruit and add a leafy green.

I usually add a little bit of sugar and some additional rice milk if I feel like it needs to be smoother and thinner. You can add a protein powder or anything else you would normally put in a smoothie.

I have read it suggested that a green smoothie should be 40% leafy green and 60% fruit. I strive for that, loosely, but I don't follow it hard and fast. I figure any amount of leafy green we can add to our diet is a good thing.

My preferred leafy green is kale because it is such a nutritional powerhouse, but spinach and romaine lettuce work well.

The smoothie below contains 2 cups of spinach, 1 cup of frozen strawberries, 1 fresh pear, and 1 small banana. There is also some rice milk and about 2 teaspoons of sugar. It yielded about 2 1/2 cups of smoothie that I split with my daughter.


My exploration with green smoothies is by no means complete. I want to try adding fresh apple and using orange juice. I find them to be seriously delicious.

Help me out and tell me: how do you make YOUR smoothie?

Monday, March 29, 2010

Banana Chip Snack Cake

First, I apologize for supersaturating readers with yet another banana/baking recipe. I can't help it--I bake what I bake. And apparently, so do many other people.

It's probably because we all experience the common occurrence of a surfeit of bananas, browning on the counter. That's my weekly conundrum, what to do with aging bananas that my uber-picky offspring won't eat. My usual answer is to bake banana muffins, a hybrid involving oatmeal and wheat germ and other things my children don't know about. But I'm sick of the things, so I went searching for another way to bake bananas into food.

I found it on pg. 549 of The America's Test Kitchen Family Cookbook. It's called "Banana Chip Snack Cake," which at first made me recoil in horror, envisioning those nasty banana chips (sorry if you love them so) somehow baked into a snack cake. But the chips are actually semisweet chocolate, so...phew.

This one's straightforward and made the most beautiful cake batter I've ever seen. And, my kids love it.

Ingredients: all-purpose flour (2 c), baking powder (2.5 tsp), salt (0.25 tsp), sugar (1.25 c), unsalted butter (one stick/8 tbsp), 2 large eggs @ room temp, 2 ripe large bananas, peeled and mashed (~1 c), whole milk @ room temp (0.5 c), vanilla extract (1 tsp), and semisweet chocolate chips (0.75 c).


I did a few things while making this that differed a bit from the above. First, I cut down the sugar by about a quarter cup. Second, I used 0.75 c of heavy cream because I had it left over. I sifted the dry ingredients, beat the bananas on medium until they were quite, quite smooth, and also beat the hell out of everything else as I added it, except for the flour and semisweet morsels, which I stirred in by hand.

Steps: Grease an 8x8 pan. Oven at 350. Mix flour, baking powder, salt in medium bowl and set aside. Beat the bananas or mush them, whichever. In a large bowl, beat sugar and butter until smooth and fluffy. Add in eggs, one at a time, followed by bananas, milk, and vanilla, beating well on medium until quite smooth. Stir the flour into the egg mixture, and then the chocolate chips. Smooth into the pan and bake between 55 and 65 minutes. Mine was perfectly done at one hour on the dot.

The cookbook says to cool for 2 hours. Um, no. We turned it out, let it cool about five minutes, then cut right into it. It was quite a hit. (That's the bottom you're seeing in the pic...the chips kinda sink down into their own layer there).


This cookbook also offers a nice tip that might help those of us with uneven banana ripening schedules. If you've got a banana you want to use, but it's not quite ripe enough, pop the entire thing, peel and all, into the oven (about 350) for 10-15 minutes. It'll brown just as though days had passed, bringing out the sweetness and reducing the starchiness. Given my weekly banana affliction, I thought this was a great tip.

If you're not sick of banana recipes, give this one a try...and enjoy!

Sunday, March 28, 2010

Grace's fried catfish with shrimp sauce


Okay, yes, I am still allergic to shellfish (which means I did not get to sample this lovely sauce). And, well, to be completely honest, I had very little to do with cooking this meal. I think, at one point, I was supposed to slice a lemon for the fish, but having been distracted by either a small boy or a small dog or a very delicious pomegranate martini, I never quite got around to it.

As a bit of background, we've fallen into a lovely routine on Friday nights—dinner with dear friends that very often finds us with three generations sitting around the dining room table. As we recently figured out, this little tradition that we started over the long snowy winter will soon fall prey to Friday night sports as the boys head back out to the field for little league and softball and soccer games. I cannot tell you how sad this makes me. Yes, I will miss the food (remember the chicken francaise?), but more importantly I will miss the conversation and the laughter, the easiness and the warmth of our evenings together.

This is what you need to get started:

Catfish filets
Two eggs, beaten and seasoned with cayenne pepper and salt to taste
Bread crumbs
Oil and butter for frying the fish

You can prepare the fish ahead of time, dipping each filet into the seasoned egg mixture and then coating with bread crumbs. Set the fish aside for frying after the sauce is prepared.


For the sauce, you will need:

1 pound of large shrimp—peeled, cleaned and sliced in half (season with salt and pepper)
8 tablespoons of butter, divided in half
1 small onion, chopped
3 cloves of garlic, chopped
1/2 cup of good white wine
3 tablespoons of flour
2 cups of chicken broth
1/4 teaspoon of red pepper
@ 6 drops of Tabasco sauce
Salt to taste


Saute the shrimp in the butter until it is just pink. Remove the shrimp and the liquid from the pan and set aside.

In the same pan, saute the onion and garlic in the other half of the butter. When the onion is translucent, add the wine and bring to a boil.


Whisk in the flour, and then gradually add the chicken broth, continuing to whisk to a sauce-like consistency. Add the red pepper, hot sauce and salt.

Return the shrimp and its liquid to the pan and heat until just warm.


Once the sauce is made, fry the catfish and arrange it on a platter.


To serve, you can either pour the sauce over the fish, or take each to the table separately, allowing everyone to serve themselves.


We served this with jambalaya rice (straight out of a box) and a green vegetable. And though I had to forgo the shrimp sauce, there were plenty of ohhs and ahhs around the table, all of which tells me that the sauce was a winner.

One of the nice things about this meal is that everything can be prepared in advance, leaving the fish to be fried right before serving. You can even make the sauce hours ahead of time, gently reheating it, if necessary. The rice was a nice compliment to the fish, but you can also serve the sauce over pasta, adding a can of diced tomatoes with jalapeno peppers to give it more depth. It's a fairly spicy meal, but I don't think it would suffer from less heat if that is your preference.

Want to see what we had for dessert?

I can't give you the recipe because we simply opened the box and followed directions for baking and frosting the cake, but if you like chocolate, you'll want to know about this:

Thursday, March 25, 2010

Perfect rice

It took me a long time to master the art of cooking rice. Years ago I would buy small bags of rice at the grocery store, fret over the measurements, try to figure out how to cook the right amount or to cook the amount left in the bag, and then find myself confronted by a soggy, gelatinous mess. Then I moved to the Philippines, where rice is a breakfast, lunch, dinner kind of thing. After attempting a few times to make the rice for our household meals, I was tenderly taken aside and asked not to keep trying. Lucky for me, we soon hired a local woman to help with the household chores (washing the clothes in the river also was not my strong suit). Baby, as she was called, taught me the trick to cooking rice, each individual grain perfectly fluffy every single time. Now I will share the trick with you. It is so simple and will make your life so much easier that you will thank me for it any time you want to quickly throw on a pot of rice but don't want to sweat over getting the measurements right.

Here's what you will need: rice, any sized pot with a snug fitting lid, and water.

First, pour whatever amount of rice into the pot that you estimate will suit your needs. Remember, 1 cup uncooked rice = about 3 cups cooked.

Then, rinse your rice (what? you don't do this? if you saw where that rice was before it was poured into that sack you would probably change your mind, but until then: just trust me. Rinse!).  Next, shake the pot so that the rice is level on the bottom. Now, locate your middle finger. Actually, locate the line of the first knuckle of your middle finger on the palm side of your hand. Got it? Rest your finger tip gently on top of the rice and add water until it reaches that line on your finger. See? Not a measuring cup in sight!


With water and rice in the pot you are ready to cook. Place your pot on the stove, uncovered, and bring to a boil. Once the water is boiling immediately cover the pot and lower the heat to the lowest flame. After 20-25 minutes turn the heat off and let it steam for a few more minutes.

Don't worry so much about over-cooking your rice. A few minutes extra and you might get lucky and end up with the crust at the bottom that is highly prized among rice eaters for it's wonderful nutty taste!

I almost exclusively cook with Jasmine rice but this method can be used with any variety of white rice.


Wednesday, March 24, 2010

Guilt-free cream of potato soup

Looks like I'm the last one here. Thanks for saving me the seat next to the other Melissa. Yes, let the confusion begin! You can call me Melissa H. I, too, was invited by Niksmom and am thrilled to be part of this dinner party. I also join the ranks of having a child on the autistic spectrum (Asperger's), as well as Bipolar Disorder Type 1. When he isn't keeping me busy, I am a runner and also enjoy health & fitness, in general. You can find me at I Don't Need Excuses. (For the most part, that's true. :-D)

I'm also a pescetarian, which basically means that I eat seafood, dairy and eggs, but no meat. I am also pretty health-conscious, and try to balance out my meals with a healthy protein. This means that a lot of my dishes end up being inspired by the meat-filled comfort foods of my youth. This one is no exception!

I could probably eat soup every day. It doesn't matter that I live in the Sunshine State. To me, soup tastes just as good in 95 degree weather, as it does during the chilly months! I had a delicious recipe for a cream of potato soup that probably had close to a billion calories per serving, most of it from carbohydrate or fat. I knew that there had to be a way to add protein and eliminate fat, without sacrificing taste. That's how this yummy recipe was born! I promise that you won't miss the fat. It is so simple, but the flavors are divine.

- Ingredients -
6 red potatoes, peeled and diced
3 c fat free cottage cheese
1/2 c fat free sour cream
4 c vegetable broth (or water and bouillon cubes)
1 c white wine (optional, but really adds to the flavor)
dried dill

- Directions -
Bring the broth, dill and potatoes to a boil. Simmer until tender. Remove from heat. Using a stick blender, blend the 3 cups of cottage cheese until smooth. (note: you can use a regular blender or food processor if you don't have a stick blender) Add the cottage cheese, sour cream and white wine to the potatoes and broth. Blend with a stick blender (or add small amounts to a regular blender - be careful because it will be hot!) until smooth and creamy. If too thick, add some water to desired consistency. Makes 6 servings.

This soup gives you a complete protein and carbohydrate serving and, believe me, you won't be able to tell the difference between a cream-filled soup and this! I like to top it with some chopped scallions or chives, fake (soy) bacon bits and a tiny bit of shredded cheddar cheese. Serve this with a crisp salad (and my husband can't resist a crusty bread on the side) and you have a filling and healthy meal.

On a side note, if you don't have a stick blender? GET ONE!! I'll wait. Tap...tap... tap...
No, really. Go buy yourself a stick blender. It has to be the best tool that I have in my kitchen. I think I purchased it, along with some nifty side gadgets, for a mere thirty bucks at WalMart. It is well worth the investment. Oh, and you'll most probably see it used quite often in my recipes, too!

That's it for my stick blender and me... until next time!

Tuesday, March 23, 2010

Chicken with chickpeas and couscous

This seat taken?  No? Great! Thanks so much for letting me join you for dinner tonight. It's really nice to meet all of you too.  I'm Melissa, and I was invited to this party by my friend Niksmom.

I'm one of the new contributors here and have been a reader since (Never) Too Many Cooks was launched. When I'm not here, chances are you'll find me at my blog, The Betty and Boo Chronicles where I'm generally talking about books, current events, my 8 year old twins, life on the autism spectrum (my son has Asperger's), my novel-in-(ahem ...) progress, or sharing a recipe.

Speaking of which, I happened to bring a dish for you to try. I wanted to bring something impressive for my debut, but instead this is pretty basic and simple.  

I had 3 boneless chicken breasts to use up last week. (The kids are generally the only ones who eat poultry in our house. The Husband is a vegetarian  - well, technically a pescetarian - and I would be considered a semi-vegetarian or flexitarian. The kids are carnivores.  All this, plus a smorgasbord of other dietary quirks and preferences, usually make for challenging interesting mealtimes at our house.)

Anyway, my kids are always much more receptive to a new dish if I I call it by a creative name. So instead of telling them this was chicken with chickpeas and couscous (which would have prompted a chorus of borrrr-rrring!) I referred to this dinner as Chick, Chick, Cous - as in Duck, Duck, Goose. They got a big kick out of that.  And devoured this. Hey, a mom's gotta do what a mom's gotta do.

I started by making a basic marinade for the chicken that I borrowed from a Rachael Ray recipe ("No Mystery: Marinated Beef, Chicken, Pork, or Portobello Mushrooms") as found in her cookbook, Rachael Ray 30 Minute Meals 2.

1/3 cup extra virgin olive oil
3 tbsps red wine vinegar
2 cloves garlic, chopped (I used jarred minced garlic)
1 tbsp. chopped fresh thyme (I used a generous pinch of dried)
1 tbsp. chopped fresh parsley (same as above)

(Rachael's marinade also calls for 1/4-1/2 tsp. red pepper flakes, but that would not have been popular in my house, so I omitted.)

Combine marinade ingredients in the bottom of a shallow dish. Season [chicken] with salt and pepper and set into marinade and turn to coat. Allow meat to hang out 10 minutes, turning occasionally. (I like the quick marinading time for times like this when you get inspired for dinner at the last minute.)

Heat a nonstick skillet over medium-high heat. Add marinated meat and cook 5-6 minutes on each side. Remove to a warm platter.

I had a craving for couscous so I simply opened up a box and cooked that while the chicken was doing its thing. I also thought chickpeas would add a healthy boost to the meal (my kids and I love them) so I added a can to the couscous.

That's it. The kids and I liked this. (The Husband was working late.) Yeah, it isn't the most colorful dinner or something that is going to knock your socks off, but it's easy, simple, and healthy which my modus operandi in our kitchen. (For additional color, you could perhaps add some veggies to the couscous. I might try that next time.)

There were also plenty of leftovers for me to take for lunch the next day.

Thanks so much for inviting me to dinner! See you again in two weeks, if not sooner.


Monday, March 22, 2010

Savory spring salad


It's spring break. I haven't cooked in days because we were on break and traveling or having guests. When that happens, we eat out a lot, or we eat other people's food. But, a few days ago, I made one of my favorite salads.

I know. Salads aren't exciting, and probably most people reading this know how to make a damned salad. But this salad is for people who are sensory seekers, who want flavor to savor with their greens, people who can handle the almost overwhelming combination I'm about to present to you. And, like I noted, it's spring. A great time for salads.

Regardless of your salad attitude, I can tell you that this little baby will load you up with all the green leafy things, colorful crunchy things, fiber, flavor, and sabor you'd need for a good lunch or a "light"-ish dinner. This is good (green) stuff.

That means, of course, that you're gonna need some greens. I use an organic spring mix with baby spinach added in. Top this with shredded carrots and shredded broccoli slaw. I buy these in bags at the store...if you can't find that, then I guess you'd need to shred these yourself or add in larger chopped pieces of these items.

Get the tartest apple you can find. Small, brightly green Granny Smiths, nicely chilled, are my favorites for this. Slice it thin, as thinly as you can. I use an entire apple for this salad. Keeps the doctor away, I hear, and I could use that.

Green olives--saltilicious!--go great on this (to my sensory and salt-seeking palate, anyway). I used the sliced kind with pimentos. Adds a nice color and yet another flavor to the mix.

I'm a sucker for blue-veined cheeses. For this salad, I go for gorgonzola, but bleu cheese would do, as well. I lay out for really good cheese, and the flavor a truly tasty blue adds to something like this cannot be beat.

Finally, there's meat. My preferred addition here is smoked turkey breast, sliced (we get the nitrate-free variety). Bacon, microwaved to crisp, is also good if you don't have turkey. This salad has so much flavor and substance, though, that you can dispense with the additional animal protein altogether if that's not your thing.

For the dressing, I prefer balsamic vinaigrette (I go with Newman's Own) or Marie's Greek Vinaigrette. Adds even more zing to this already zingy combination. Like I said, I'm a flavor seeker. I often make my own dressings, but for this salad, either of these is a wonderful finish.

Chill it until you eat it. Then, sit down with your fork and dig in to the cold, crunchy, salty sabor that is this salad. Mmmmmm.

Friday, March 19, 2010

What's cooking?

And now we are eight! Yes, that's right. Eight regular contributors to (Never) Too Many Cooks. And we couldn't be more pleased.

Next week you'll have a chance to meet our new contributors and see what they've got cooking, but in the meantime, you can get to know each of them a little bit by visiting their blogs: Melissa, Melissa H. and Christine. (Just click on their names here, and away you go...but come back, okay, 'cause there's more.)

We'll be posting on a Monday-Thursday, two-week rotation schedule. That means each of us will post (more or less) two times a month. We're leaving Fridays open at (Never) Too Many Cooks for guest posts. So, please, if you have a recipe you'd like to share, let us know.

And yes, we're working on the ads. Hoping to resolve that soon.

Thanks again for all your support. We'd like to extend a warm welcome to our new contributors and their regular readers... It is our hope to see this blog grow into a supportive community for shared thoughts on food and all things related. We need your help to do that—so, leave us a comment, send us a recipe or just stop by to say hi!

Thursday, March 18, 2010

Banana-nut kugel for Passover

So here's the problem with sharing recipes for a holiday like Passover (Pesach) ahead of time: While I don't keep anything even resembling kosher during the bulk of the year, I do try to do something vaguely resembling kosher for Passover during those particular eight days. (It's my version of kosher for Passover, and it involves--essentially--my cleaning out our kitchen cabinets and putting all the chametz into our pantry where N can get to the things he can prepare for himself and the rest of us can ignore them entirely.) There's lots of stuff I don't do, but what I do do...well, I like to actually do that little bit "right." So I don't open the matzo or any of the other Passover staples until the last possible moment, generally the day of the first seder, when I'm preparing the meal. Which means that I also can't/won't make a dish several days ahead of time, photograph it for this blog, and freeze it to serve at my seder. Nor do I want to open my slated-for-Passover ingredients to use only a small amount of them, then throw the rest out.

And so, you get a stock photo of bananas, instead of a shot of what is seriously one of my and Em's favorite dishes, Passover or no. (I'll be making it not only during the eight days, but several times in the weeks and months after--no prohibition about using Passover foods after Passover.) But take our word for it: This is good stuff. I serve it as a side dish, but it verges on being dessert. And you definitely don't need to be Jewish to enjoy it.

Banana-Nut Kugel (adapted from a 1992 recipe my mom got off of her Prodigy--remember them? if you do, you're old like me--Food and Wine Club mailing list)

3 cups matzo farfel (or just take a few sheets of matzo and crumble 'em up, which is what I generally do, since farfel is just crumbled up matzo but costs like four times as much per ounce)
4 eggs
1/2 teaspoon salt
6 tablespoons sugar
1/4 cup melted butter
2 medium unripe bananas, sliced
1/2 cup chopped nuts (I usually go with walnuts for this one, but pecans work, too; though I'm usually an almond fan, I don't think they'd work so well here)

1. Preheat oven to 350.

2. Put farfel in colander; run cold water over farfel; drain immediately. What you want is farfel that's moist, but not overly soggy.

3. In a separate bowl, beat eggs with salt, sugar, and melted butter.

4. Add farfel and mix to coat.

5. Grease a baking dish. The recipe recommends a 1-1/2 quart dish; I just whichever one is clean and isn't too big for the job.

6. Spoon half the farfel mixture into a layer in the dish. Place sliced bananas over the mixture, then sprinkle nuts over the bananas.

7. Cover the bananas and nuts with the rest of the farfel mixture.

8. Bake uncovered at 350 for approximately 45 minutes, until set and lightly browned on top.

Incredible. Seriously. Try it.

(And, hey...While I'm not by any stretch of the imagination The Jew To Go To for information about my religion, I'm happy to try to answer any questions you might have about the various rituals and such around Passover. It's one of my favorite holidays--and yes, that's mostly because it's all about trying out and using recipes you pretty much ignore the rest of the year.)

Wednesday, March 17, 2010

Mediterranean-inspired sauteed chicken with olives and vegetables

[ETA: Sorry, poor planning on my part...no Irish-themed recipe today.  Happy Saint Patrick's Day! Celebrate by trying something new! ;-) ]

Blame it on my new Cooking Light cookbook which is devoted entirely to chicken; you're going to be seeing a lot of chicken recipes coming from me as the weather gets warmer.  This one, however, isn't from the actual cookbook —it was merely inspired by the gorgeous photographs and tantalizing recipes between the covers.  In fact, true confession, I hadn't even planned this recipe out when I made it.

I'd spent the morning perusing the pages of this awesome new cookbook, marveling at how easy some of the recipes were.  Inspired, I went grocery shopping in the afternoon to acquire ingredients so I could try a few of the recipes over the weekend.  I got so caught up in shopping for all the glorious ingredients that I lost all track of time.  I arrived home with about fifteen minutes to throw together something for dinner that wasn't pizza and wasn't just leftovers-over-salad or leftovers-with-salad.

Let me tell you a cooking secret... it's always easier to improvise when you have great ingredients on hand!  It's not, however, easier to photograph the ingredients for the recipe when you're kind of flying by the seat of your pants.  Translation: Sorry, no pictures of the ingredients. Or the main course on a plate; we were racing the clock to eat before our son fell asleep on the sofa.  (He's been ill, but that's another story for a different blog.)

Here's what you'll need for this super easy recipe that will wow your family or your guests. Truly, my husband loved it so much he wanted to go back for thirds! That almost never happens. (This recipe is naturally gluten- and dairy-free.)

Ingredients:
  • 4 boneless skinless chicken breasts —OR the equivalent in leftover roast chicken from your mother's generous meal the night before.  Guess which one I used.
  • 1 jar or can of quartered artichoke hearts, drained
  • 10-12 spears of new/baby asparagus, cut into 2-3 inch pieces
  • 1 medium onion, sliced into medium wedges
  • 1 medium jar (approx. 1 cup) kalamata olives (bonus if they're pitted!)
  • 1 medium lemon, slice one half into thin slices
  • 1 cup white wine
  • 1 cup chicken broth
  • olive oil
  • oregano
  • 3 cups cooked rice

In a large skillet, lightly brown the chicken breasts in a glug of olive oil then set them aside.  Add another short glug to the pan and sautee the onions until they're nearly translucent. Add asparagus, artichokes and olives; lightly sautee them.  Add the lemon slices and pour in the wine and chicken broth.  Stir the mixture in the pan.

Add chicken to the mixture, season generously with oregano, then cover and cook until chicken breasts are fully cooked.  Approximately 8 minutes (more if they are large breasts).  If you are like me and are using up already-cooked leftovers, the cooking time will be significantly less.

You can either add the rice into the pan (which is I what I did because I wanted more of a casserole-style meal) or serve the chicken and vegetables over a bed of rice.  In either case, just prior to serving, give a generous squeeze of juice from the remaining half-lemon over the plate for a yummy, Mediterranean-inspired dish.


[Of course, after I've made a meal for the first time, I spend some time considering what ingredients I would change or add, what flavors or textures, colors or seasonings I might change up to either make the dish better or simply to put a new twist on it.  With this particular dish, I might change the kalamata olives for spanish olives with pimientos just for some interesting splashes of color.  I used yellow onions but might try red the next time.]

Monday, March 15, 2010

Herb roasted chicken breasts

We eat a lot of chicken, so I am always looking for healthy, quick ways to prepare it. This variation is loaded with flavor and yet is easy enough to throw together for a mid-week dinner.


You don't need much to get started. I use bone-in chicken breasts with the skin on, but you could easily use a whole cut-up chicken.

You'll need:

Chicken breasts
Olive oil
Kosher salt
Fresh ground pepper
Rosemary
Thyme

Rinse the chicken pieces and pat dry. Drizzle with olive oil and rub the oil into the skin—top and bottom.

Sprinkle each breast with kosher salt, fresh ground pepper and the herbs. (I used dried herbs only because I didn't have fresh. Either way is fine.)


Roast in a 350 degree oven for 45 minutes. Then turn the oven up to broil for a few minutes to give each piece a nice golden brown finish.


I usually serve this with rice or couscous or pasta (we are not big on potatoes in this house unless they are french fried!) and a green vegetable. Enjoy!

Friday, March 12, 2010

Scalloped potatoes with ham

Once again, my cooking impetus consists of what's sitting around in my kitchen at the turning point of usable/not usable. This time, it was some beautiful small Yukon gold potatoes and uncured sliced applewood-smoked ham. Why, I thought, I'll make scalloped potatoes with ham.

Scalloped potatoes are tasty and pretty, and their only drawback is the bit o' work required to peel and thinly slice them. So, that's what you do first.


I had about 12 small potatoes, just a bit larger than fingerlings. The pan was an 8-x-8 pyrex, oiled with olive oil. That's important, because I've learned from experience that insufficient oiling leads to much sticking of potatoes.


Put a layer of the sliced potatoes on the bottom of the pan and sprinkle with a bit of olive oil and some salt and pepper. On this, sprinkle some grated cheese--I used a colby/jack combo because my children would be eating this, too, but I'd've used Gruyere where it only for me. I cut up the ham, about eight pieces sliced on the one setting at the deli, into centimeter pieces and sprinkled a bit of ham on this layer, too.

Continuing layering potatoes, salt, pepper, olive oil, cheese and ham until you run out of it all.


Finally, I mixed together 3/4 cup of chicken broth and 3/4 cup of heavy whipping cream and poured it over the top.


A sprinkling of cheese to cover the top, a covering with foil (important!), and this went into an oven preheated to 350 F for about 1.5 hours.


It smelled divine as it baked and emerged as a tasty hammy-cheesy potato dish that even my children would eat. We had this with green peas and buttered sourdough.

You can dress this up with a bit of flavor expansion by adding some canned, chopped poblano pepper to it and using jack cheese.

Thursday, March 11, 2010

Prepping for Passover: Matzo

From Wikimedia Commons: Photo taken on April 12, 2006 by Yoninah.

So let's get this out of the way right up front: If you're Jewish and you keep kosher for Passover, this is an almost completely useless recipe. Because, clearly, you can't make matzo in advance of Passover and eat it during Passover and have it be anything even vaguely kosher. Trying to make it during Passover, even, is flirting with disaster; I mean, where would you get the KP flour in the first place? You certainly can't just use your local store brand. And even if you found the right kind of flour, there's so much halakhah associated with matzo...It's just not worth it.

No. This recipe is meant for fun and education only, something for Jews and non-Jews alike to do with their kids in the weeks leading up to the holiday, so you can discuss what making matzo is all about, what its meaning is, why it's eaten during these particular eight days.

Not that I've actually done that this year, mind you--as you'll notice from the lack of photos in my kitchen accompanying this recipe. But I have an excuse! It's not a good one, but it's an excuse. See, my kids' religious school took them on a field trip last weekend to the Model Matzo Bakery in Westwood, where they did all that--talked about the meaning of the holiday, made their own matzo, ate it, complained about not having anything to put on it, complained about it being burnt at the edges, complained about how this friend got a bigger piece and that friend's one wasn't burnt as much...never mind that they didn't like the way it tasted in the first place.

Perhaps you can see why I'm not all that jazzed about the idea of doing that all over again in my house this year, yes?

Still, it was actually a really fun trip, and tasting 'home-made' matzo got me excited about the upcoming holiday and all my only-at-this-time-of-year recipes, some of which I'll share with you over the next few weeks.

But to do that, I figured, I should start with the basics. And when it comes to Passover, it doesn't get any more basic than this.

Matzo/Matzoh/Matza/Matzah

1 part cold water
3 parts flour

Aaaaaaand...that's it on the ingredients, ladies and gents. You will, however, want to have a rolling pin and some kind of dough-poking implement (a fork will do the trick) on hand. Plus something to bake the matzo on; see instruction number seven.

Here's the quick and dirty on what to do:

1. Turn on your oven; you want it at as high a temperature as you can get it without it being on broil. (Actually, what you really want is a matzo oven, which is something like a brick pizza oven. But I'm assuming that you don't have one of those any more than I do, so let's go with the highest-temp-you-can-get concept and leave it at that.)

A note: If you want to do this as authentically as you can, you need to do this oven-preheating way in advance. You don't want to have to wait any time at all during the actual process for the oven to heat up, since "real" matzo needs to be made and fully cooked within 18 minutes from the time you add the ingredients together. Why 18 minutes? Supposedly, 18 minutes is the amount of time it takes for bread to start to rise. Thus, you'll want to have everything you need on hand (including a timer that you'll set when the time comes), get your work area prepped ahead of time, and make sure the oven has heated to its top temperature. In other words, you'll need to work quickly.

2. Combine cold water and flour; start your timer, as soon as you pour the water into the bowl.

3. Mix the water and flour until combined, and knead the resulting dough into a ball.

4. Pull off a piece of the dough and roll out on a lightly floured surface into as thin a circle as possible. (It doesn't need to be a perfect circle; you don't have time for perfection! You're a slave escaping Egypt, remember?)

5. Poke holes into the dough with the fork. This is to prevent the dough from rising. If it could. Which it can't, since there's no yeast, and not enough time. But, still...poke. Just in case. (Makes sense to me. But then again, I'm an obsessive-compulsive. So, you know. Grain of salt.)

6. Keep rolling out matzos until about 12 to 14 minutes have passed, at which point you'll want to throw whatever you've made into the oven.

7. The recipe I found says you should bake them for two to three minutes, but my oven seems to take at least four. They also say you should bake them on "baking tiles." If you have a pizza stone, that would do the trick. But if you're like me, it's parchment paper on cookie sheets.

8. When your set-for-18-minutes timer goes off, pull 'em out of the oven--cooked or uncooked. Let cool for a few minutes, then give 'em a taste.

Mmmm. Nothing like hard, tasteless sheets of flour-paste, eh? Well, if that's how you feel, you've got it all wrong, people. Matzo is the World's Greatest Butter-and-Salt Delivery System. Or spread some peanut butter on it. Maybe some egg salad? A little tuna? Tuna and cheese, popped back into the probably still-warm oven so that you get a matzo tuna melt?

The possibilities are endless.

Ah, matzo. Dayenu.

Tuesday, March 9, 2010

Guest post: Roast leg of lamb and spinach salad

I am Armenian. And you can't be Armenian without learning how to make a lamb roast. Of course, I suffer from the "I cannot cook as good as my mother" syndrome. No daughter of an Armenian mother ever feels that she measures up, however, I think I have come very close. When I first started cooking, I deliberately made dinners that wouldn't compete with my mother, such as chicken curry and tuna casserole. It was a cop out, but a start.

With that in mind, it's hard to believe that I ever had the courage to tackle a roast leg of lamb. Believe me, I have had my share of mishaps here—under cooked, over cooked and just plain tasteless. But I kept at it until I found the perfect formula. Dare I say, it's even better than my mother's?  

Roasting requires a bit of trial and error. You may have to make a dish several times, before hitting on the exact seasoning and cooking time. But if you follow my advice, I promise you a shortcut to success.

Ask your butcher to roll and tie a 4 pound leg of lamb. 

Then marinate it for four hours in: 

1/2 cup of olive oil
1 tablespoon ground coriander
1/2 tablespoon of paprika
1 teaspoon of salt
1/2 teaspoon of pepper

Here's an important tip: Do not ever use citrus in the marinade. It makes the meat tough. 

Preheat the oven to 425 degrees. Roast the lamb for 25 minutes, uncovered. Then lower the heat to 300 degrees and continue roasting for approximately an hour and a half (two hours total roasting time) or until a meat thermometer registers 155 degrees.

Let the meat rest for about 15 minutes before slicing. Ideally, lamb should be served on the rare side, but if you prefer your meat less pink, you can increase the cooking time. 


I served the lamb with a wonderful spinach salad. The recipe for the salad comes from my cousin's restaurant Charentsi 28 in the capital city of Yerevan, Armenia. I visited my family in Armenia last year, and loved the beautifully updated traditional dishes served at the restaurant.

To make the salad, you need:

1 bag of baby spinach (buy the pre-washed stuff)
1 bunch of beets (do not discard the leaves as they are going into the salad)
Portobello mushrooms (again, buy pre-sliced but rinse them)
1 cucumber, peeled and sliced 
1 red onion, sliced thin

Cut and wash the beet tops and mix with the spinach greens in a large bowl.

Boil the beets, until the skins come off easily (I then roast the beets until tender, but you could just boil them till they are tender.) Set aside to cool.
While the beets are cooking, saute the mushrooms in butter for about 4 minutes (add water to avoid burning if necessary). Drain most of the liquid. And set the mushrooms aside.

For the dressing (the most important part) you need:

1/3 cup olive oil
1/4 cup lemon juice
1 large clove garlic, crushed
about 1/2 tsp salt and a 1/4 tsp pepper (to taste)

Using a wire whisk, mix the dressing ingredients well and set aside until just before serving.

To assemble the salad, add the sliced onions and cucumbers to the bowl with the spinach and beet tops. Slice the cooled beets and add, along with the mushrooms to the greens. Pour the dressing on and mix well. Using lemon instead of vinegar in the dressing makes all the difference here. Enjoy!


*****
Now that Virginia has expanded her repertoire beyond chicken curry and tuna casserole, she is pursuing a wide range of culinary adventures both at home and abroad. She blogs at In The Heart of a Former Hippie and can be found studying cookbooks and travel brochures in her spare time.

Sunday, March 7, 2010

Baked ravioli


My eight year old loves cheese ravioli. And while I most often prepare it during the week with a simple butter and sage sauce, I thought I'd try something different for our weekly family dinner with the in-laws.

Baked ravioli is extremely easy to make. You can use a simple tomato sauce or a meat sauce, layer in spinach, other vegetables or sliced meatballs, even opt for meat stuffed ravioli or something more exotic, like portobello mushroom—the variations are endless. 

I decided to use homemade tomato sauce and big fat round raviolis stuffed with ricotta cheese.


To make the sauce you need:

1 small onion, diced
1 large can of tomato puree
1 large can of crushed tomatoes
Crushed basil and oregano to taste
Garlic (I used 1 generous teaspoon of crushed garlic)
2 tablespoons of grated parmesan cheese
Salt and pepper

You will also need large ravioli (I used 4 boxes of 12) and grated mozzarella cheese.


Saute the onion and garlic in a bit of olive oil, then add the tomato puree and crushed tomatoes. Stir in the basil, oregano, salt and pepper, and add the grated parmesan cheese.


While the sauce simmers (about 20-30 minutes), bring a large pot of salted water to boil. Cook the ravioli until just tender. If you are using fresh ravioli, this won't take long. Drain the pasta water and let the ravioli cool—just long enough to handle easily.

Spread a thin amount of sauce in a large casserole dish. Add a layer of ravioli, making sure to overlap slightly.


Cover with another layer of sauce and grated mozzarella cheese. Repeat—ravioli, sauce, cheese.


Bake, uncovered, in a 350 degree oven for 30-40 minutes, or until sauce is bubbling and the cheese is fully melted.


I served this with grilled asparagus and a loaf of garlic bread. My husband has already staked a claim on the leftovers!

Printfriendly