Showing posts with label vegetables. Show all posts

Monday, September 6, 2010

Farewell to summer dinner (with grilled veggie kebobs and garlic bread with fresh tomato and mozzarella)

My in-laws visited us this weekend and I wanted to make a "farewell to summer" dinner using some local produce.  So on Saturday, Betty and I took my mother-in-law to a nearby farm where I bought corn on the cob, zucchini, yellow squash, an onion, mushrooms, red potatoes, tomatoes, and fresh mozzarella.  All would find their way into that evening's dinner.

I wanted to make veggie kebobs on the grill and submitting this recipe seems like cheating here because my friend and fellow cook Kristen already posted a similar dish back in May.  (See her post Grilled chicken shish kebob.)

Grilled Vegetable Kebobs

I didn't really measure anything with this one.  Basically, I used two zucchini and two yellow squash, approximately a pound of small red potatoes, half of an Empire sweet onion, and approximately a dozen (maybe less) white mushrooms. 


I boiled the potatoes for 10 minutes while cutting the onion, squash, zucchini and mushrooms into chunks and marinating it for about 20 minutes with Italian dressing.  (I threw the potatoes - some of which I kept whole, others which I halved or quartered - in during the last 10 minutes of marination.)

I didn't measure the amount of dressing either, but if I had to do this again, which is very possible, I would cut down the amount of dressing I used. (Nobody said anything, but I thought the kebobs were slighty too tangy.)

Then I threaded the vegetables onto metal skewers.  (Even when I soak the bamboo skewers, they tend to catch on fire.  I spent most of my summer looking for metal skewers and finally found them at a different farm, also nearby.)


The Husband grilled the kebobs for about 10 minutes, turning once.  This made 8 kebobs.

Along with this, we grilled hot dogs (for the kids and in-laws) and veggie burgers for us. I also boiled corn on the cob. Finally, I changed my mind from preparing a caprese salad and instead enhanced some store-bought garlic bread by adding slices of fresh mozzarella and fresh tomato.


I left one side of the garlic bread plain because several folks at our table aren't fans of tomatoes.  Cooked it in the oven for 7 minutes and then let it cool, cutting each of the sides into smaller pieces and arranging on a serving platter.  (No pictures of that ... they disappeared too quickly.)

Dessert was a selection of homemade ice creams from another nearby farm - vanilla, chocolate, peach, and coffee. 

All in all, a delicious ending to a wonderful summer.

Tuesday, July 27, 2010

Ratatouille (in the crockpot)

I had a bit of an eggplant dilemma over the weekend.  You see, I have a bit of a habit of buying unknown-to-me-produce at the farmer's market.  The cuter the name and the cuter the item, the chances are great that it is coming home with me, even if I have no idea what I am going to make with it. 

That was the situation last weekend, when I purchased these at the farm:

The purple and white globe is apparently a Graffiti Eggplant, the long and narrow ones are Green Goddesses, and the short round ones are the adorably named Kermits. 

(C'mon, would you have been able to leave a Kermit at the farm?  Especially with the meat case just a few dangerous feet away?)

So they came home with me and there they sat, awaiting some decision from me as to what I would make. 

Over the weekend, I had ratatouille on my mind so I turned to Not Your Mother's Slow Cooker Cookbook  by Beth Hensperger and Julie Kaufmann. Sure enough, on pages 133-134, there's a slow cooker recipe for ratatouille, described as a regional vegetable stew from Provence.

Ingredients:
1 large eggplant, 1.5 lbs., peeled and cut into 1" cubes (I used the graffiti eggplant, one Kermit, and one Green Goddess because the graffiti wasn't what I would have considered large)

salt
1 medium sized yellow onion, coarsely chopped
2 medium-size or large bell peppers (green, red, orange, or yellow), seeded and cut into big squares
10 plum tomatoes, peeled and chopped, or one 14.5 oz. can diced plum tomatoes, drained
2-3 cloves garlic, to your taste, minced
1/2 cup olive oil
5 zucchini or summer squash , ends trimmed and cut into thick rounds
1-2 tablespoons chopped fresh basil, to your taste
freshly ground black pepper, to taste

1. Put the cubed eggplant in a colander and sprinkle with salt.  Let stand 1 hour to drain.  Press out the excess moisture with the back of a spatula and pat dry with paper towels.

2. Combine the eggplant, onion, bell peppers, tomatoes, and garlic in the slow cooker. Pour over the olive oil and toss to coat.  Cover and cook on HIGH for 1-1.5 hours or on LOW for 2-3 hours.

3. Stir in the zucchini.  Cover and continue to cook for HIGH for another 1.5 hrs. or on LOW for 2-2.5 hours. The last hour, add the basil and season with salt and black pepper.  The vegetables will be cooked but will still hold their shape.

Some serving ideas mentioned in the book include serving hot with crumbled goat cheese sprinkled on top (this is what I did, especially since I can't resist any opportunity for goat cheese), at room temperature with lemon wedges and freshly grated parmesan cheese, or cold drizzled with balsamic vinegar. Serves 4-6.

Saturday, July 10, 2010

Lemon basil bowtie pasta salad

I love this summer side dish. It's just right for a light lunch, or as an accompaniment to grilled chicken or fish.

Here's what you need:
1 box of bowtie pasta
1 bunch of baby asparagus
1 bag of frozen peas
@ a handful of sundried tomatoes (I used the ones NOT packed in oil)
@ a small handful of fresh basil, chopped
Juice of one large lemon or two small ones
@ two tablespoons of basil olive oil (if you can't find the infused oil, substitute plain olive oil)
salt/pepper to taste

Wash the asparagus and cut the ends; then grill until just tender. I did mine stovetop on the grill pan, drizzling with just a tiny bit of olive oil as they cooked.
Set aside to cool, then cut into inch long (or bite size) pieces.

You can either leave the peas to defrost on their own, or steam them quickly in the microwave. If you steam them, set them aside to cool. Chop the sundried tomatoes into bite size strips.

While you are preparing the vegetables, set a large pot of water to boil and cook the pasta according to package directions. When the pasta is ready, drain and drizzle with a bit of olive oil to prevent sticking.

Once all the ingredients have cooled to room temperature, toss the pasta and vegetables together in a large bowl. Add the lemon and basil oil, chopped fresh basil, salt and pepper to taste. A word on the lemon: be generous. If you feel like you can't taste the citrus, add more. It's the tang that gives this dish unique flavor.
Serve at room temperature, sprinkled with parmesan cheese.

Thursday, June 24, 2010

Zucchini and Breadcrumbs

You guys know how it is. Anyone who's ever had a vegetable garden knows how it is.

It is zucchini time.

I am not complaining. Nope. Only two plants grew this year, and still I'm drowning in the stuff. But that's good. It's all good.

Because I have recipes like this one.

Zucchini and Breadcrumbs (adapted from a Cook's Illustrated recipe called Zucchini with Garlic and Lemon)

For the zucchini:
(I'm going to give you the amounts they give, but really...this is one of those "however much zucchini I have on hand, and adjust the rest to taste" recipes.)
5 medium zucchinis, shredded
kosher salt (or table salt if you prefer)
1 clove garlic, minced or pressed
4 teaspoons extra-virgin olive oil
1 to 2 teaspoons fresh lemon juice
ground black pepper

For the breadcrumb topping:
(I also pretty much go by feel on this one, too.)
2 slices of white bread, torn (I often use whole wheat, since that's what we keep in the house; when I'm feeling lazy, I just use processed breadcrumbs. They're not as good, but you already knew that, I bet.)
2 tablespoons butter

To make the zucchini:
1. Shred zucchini on large holes of box grater, or in food processor. Cook's says to avoid shredding seeds and core (which should be discarded), but I'm afraid that's above my fussiness level when cooking.
2. Toss zucchini with a teaspoon or two of salt, and put in a colander to drain for about 10 minutes, if you can. (This is when I either prepare the breadcrumbs or just work on the rest of the meal.)
3. Cook's says to then wrap the zucchini in a kitchen towel (in batches if necessary) to wring out excess moisture. Again, too fussy for me. (They're undoubtedly right, of course, but I just don't have it in me.) I just dab with a paper towel if it's still looking wet, and call it a day.
4. Combine garlic with two of the teaspoons of olive oil in a medium or large bowl; add zucchini; toss to combine, and to break up clumps of zucchini.
5. Heat rest of olive oil in skillet over high heat until faintly smoking. Add zucchini mixture to skillet; spread evenly in pan.
6. Cook without disturbing for a couple of minutes; you want the bottom of the layer of zucchini to brown. Then stir, or flip, or whatever strikes your fancy, and let the new bottom layer brown again.
7. Remove skillet from heat; add lemon juice and salt and pepper to taste.
8. Serve, sprinkling (or, in my case, blanketing) each serving with bread crumbs.

To make the breadcrumb topping (which you should do before or while you're cooking the zucchini):
1. If making your own breadcrumbs, simply pulse your bread in a food processor until...well, until it looks like largish breadcrumbs.
2. Heat butter in skillet over medium-high heat; add breadcrumbs and cook, stirring frequently until golden brown.
3. Put in small bowl and set aside until needed (or put on table so everyone can put as much on as they want!)

And, of course, enjoy! After all, it's zucchini time.

Sunday, May 30, 2010

Grilled chicken shish kebob


 This is a super easy meal to make on the grill—just right for a warm summer night. The hardest part is the prep work, and even that is truly not hard. I like to use boneless chicken breasts with onions and sweet peppers (in every color I can find!!), but you could add mushrooms or tomatoes, or even omit the vegetables completely to suit your taste.

I buy the boneless breasts whole, then cut them to size myself. The only trick is making sure the kebobs are evenly sized so they cook through at the same time. I also marinate the chicken in olive oil, vinegar and spices.
Here's what you need for the marinade:
1/2 cup of olive oil
1/4 cup of white wine or champagne vinegar (I use Trader Joe's orange muscat champagne vinegar)
Salt, pepper, rosemary and thyme to taste.

Whisk the marinade ingredients together, then pour over the chicken. Marinate for at least 2 hours.
I typically marinate meats in large Ziploc bags. It's easy and the clean up is a snap. I don't marinate the vegetables simply because I like my vegies on the crisp side, and I also like to taste my vegetables, especially when they are in season and loaded with their own delicious flavor.
I failed to mention that you also need some good metal skewers. A dozen is a nice amount to have on hand. You can also use the wooden skewers they sell at the grocery store, but honestly, I never have figured out how to use those without setting them on fire. The metal are inexpensive, easy to use and best of all, you will always have them.

Okay. When you are ready to cook, simply skewer the meat and vegetables, alternating so that each skewer has a little bit of everything. You can layer your meat and vegies in a pattern or not, whatever makes you happy.
Grill for a total of about 10 minutes. Our grill has one setting: Fire. For reasons I don't understand, we cannot adjust the temperature, but it doesn't matter, it works. If you like a little less charring on the edges, you might want to set your grill to a medium-high or medium temperature depending on how it cooks.
We've already had this meal twice in the last three weeks. I serve it with rice and either a green vegetable or a salad. Enjoy! It's fast becoming a family favorite.

Monday, May 3, 2010

Bubbly cheddar tomatoes/Roasted vegetable and cheese canapes

A couple weeks ago, I went to a demonstration class at the local Viking Culinary Center. On the menu: five great appetizers. I don't make a lot of appetizers when I entertain—I might throw together a cheese platter and some fresh vegies, hummus and pita, maybe a selection of olives, but I've never really considered myself an "appetizer" sort of gal. I'm really more about the main course—and dessert.

But it was a fun night and the recipes were fairly simple and easy to prepare. So, when my friend—who also attended the class—suggested we make two of the appetizers for a recent family party, I grabbed my camera and my wooden spoon and got to work.

Bubbly Cheddar Tomatoes

40 large cherry tomatoes
3 oz of aged cheddar cheese, cut into 1/4 inch cubes
1/4 cup prepared pesto
1/4 cup crushed herb croutons
1 tablespoon melted butter
40 small shrimp: peeled, deveined, tail off

(Yes, I'm still allergic to shellfish, and can only say that it is perfectly fine to completely omit the shrimp from this recipe.)

Preheat the oven to 450 degrees. With a sharp knife, slice the tops off of each tomato and using a small spoon, remove the membrane and seeds from inside. Then slice a small piece off the bottom so that the tomatoes will sit flat without rolling.
Place the tomatoes on a baking sheet and then spoon in some pesto and top with a cube of cheese.

Combine the crushed croutons with the melted butter and sprinkle over the top of the tomatoes. Bake for 5 minutes or until bubbly.
While the tomatoes are baking, saute the shrimp in a bit of butter and garlic until pink. Top each tomato with a piece of shrimp. Serve warm.

******
Roasted vegetable and Boursin canapes

1/2 of a small red bell pepper, finely diced
1/2 of a small red onion, finely diced
1/2 of a small eggplant, finely diced
1/2 of a medium zucchini, finely diced
2 tablespoons extra-virgin olive oil
salt and pepper to taste
15 frozen miniature phyllo tart shells
a small container of Boursin cheese
chopped fresh basil (for garnish)

Preheat the oven to 400 degrees. Combine the bell pepper, onion, eggplant and zucchini in a bowl. Drizzle with olive oil, salt and pepper and mix well.
Spread the vegies out in a shallow roasting pan and roast for about 20 minutes or until tender and golden brown.
Place the frozen pyhllo shells on a baking sheet and fill each cup with about a teaspoon of the Boursin cheese.
Top with the vegetables and bake for about 8 to 10 minutes, or until the shells are a light golden brown. Garnish with fresh basil and serve either warm or at room temperature.

Tuesday, April 20, 2010

No-cream pasta primavera

Back in the day when people had such a thing known as "discretionary income," several coworkers and I would regularly go out to lunch. By regularly, I mean this was a near-daily occurance, and among my most favorite lunches was the Chicken Giardino at the Olive Garden. (Which I always ordered sans-chicken, as I was a definite vegetarian in that era.)

Fast forward a recession (or two), a baby (or two), and those days are long gone.

Now it's a decade later and I'm wondering what to make for dinner. I have some straight from-the-farm-fresh veggies. It's springtime; I want pasta primavera but I don't want the heavy creaminess associated with such a dish. I log onto allrecipes.com.

And find this: No-Cream Pasta Primavera, as submitted by amanda1432. As I substitute farfalle pasta for penne, I realize that this looks pretty similar to my beloved Chicken Giardino.

I think this is the type of recipe where the list of veggies lends itself well to substituting whatever you have on hand. Yellow squash, zucchini, red bell pepper, and fresh green beans were not in my fridge, but baby carrots, asparagus, and tomatoes (vine-ripened) were. (Don't let the long list of ingredients scare you. This is much easier than it looks.)

Ingredients:
1 (12 ounce) package penne pasta
1 yellow squash, chopped
1 zucchini, chopped
1 carrot, julienned
1/2 red bell pepper, julienned
1/2 pint grape tomatoes
1 cup fresh green beans, trimmed and cut into 1 inch pieces
5 spears asparagus, trimmed and cut into 1 inch pieces
1/4 cup olive oil, divided
1/4 teaspoon salt 1/4 teaspoon coarsely ground black
pepper
1/2 tablespoon lemon juice
1 tablespoon Italian seasoning
1 tablespoon butter
1/4 large yellow onion, thinly sliced
2 cloves garlic, thinly sliced
2 teaspoons lemon zest
1/3 cup chopped fresh basil leaves
1/3 cup chopped fresh parsley
3 tablespoons balsamic vinegar
1/2 cup grated Romano cheese

Directions:
1. Preheat oven to 450 degrees F (230 degrees C). Line a baking sheet with aluminum foil.

2. Bring a large pot of lightly salted water to a boil. Add penne pasta and cook for 10 to 12 minutes or until al dente; drain.

3. In a bowl, toss squash, zucchini, carrot, red bell pepper, tomatoes, green beans, and asparagus with 2 tablespoons olive oil, salt, pepper, lemon juice, and Italian seasoning. Arrange vegetables on the baking sheet, and roast 15 minutes in the preheated oven, until tender.

4. Heat remaining olive oil and butter in a large skillet. Stir in the onion and garlic, and cook until tender. Mix in cooked pasta, lemon zest, basil, parsley, and balsamic vinegar. Gently toss and cook until heated through. Remove from heat and transfer to a large bowl. Toss with roasted vegetables and sprinkle with Romano cheese to serve.

Knowing that my kids wouldn't look at this if the vegetables were included, I dished out some plain pasta before adding the vegetables. (I also forgot the last few herbs and the balsamic vinegar.)

I loved this, and so did The Husband. Boo ate a decent amount of it, and Betty was only interested in the carrots and peas (which I'd added at the very last minute). It could lend itself well to the addition of chicken or shrimp. I'll definitely be making this again - in some variety - as the bounty from the farm continues to arrive with the nice weather.

Thursday, March 4, 2010

Showing off

Sunday was one of those Southern California this-is-why-I'm-willing-to-risk-the-7+-magnitude-quake-pretty-much-guaranteed-to-come-within-the-next-30-years sort of days. We haven't had a lot of them of late; the rain, she is persistent. And while there are people who love cold, rainy days, who love the moodiness of cloud cover, who love weather...I am not one of them. Give me blue skies and sun. That's about all I need.

And so, when I actually got blue skies and sun...well, I abandoned you all, is what I did. Instead of following through with my plan to spend some time in the kitchen in order to put up a recipe for you today, I headed out into my garden with my kids and my camera. I can't say that I regret it, either. In fact, it was one of the best days I've had in a long while.

(I should say right now--in the interest of full disclosure--that most of the photos in this post were taken by Em. She couldn't take the one at the top, since she's in the one at the top, but the rest? They're hers. She's something else, that girl.)

But it was relevant to this blog, I decided, because, really, my garden is alllllll about food. The vast majority of what I plant is edible. I seriously love almost nothing more than feeding people--feeding myself--something that just came out of the ground not fifteen minutes earlier. In fact, that's exactly what I did that day; we'd invited our Sunday Gang to come and play (a total of eight adults and ten kids when we're all together, and we were indeed all together that night), and so I picked snow pea pods and baby carrots, washed them and put them out. I didn't even peel the carrots; they're thin-skinned and perfect exactly as they are.

They were gone within half an hour. And the adults had to fight off the kids to get to them.

Right now, my garden love is centered on the pea pods and carrots. (Em got excited about photographing the snow peas, and so sort of neglected the carrots. Poor carrots. Next time.)

The broccoli (what little grew from the seed I set out in the fall) is done, as far as eating goes, but it's flowering, and it's so beautiful when it flowers. (Yes, I grew up in a city, and yes, I'll admit it: It wasn't until the first time I saw my broccoli flower that it hit me...Ooooohhhhhhh. Those green dots that make up a broccoli floret? They're flower buds! Perhaps that's why they're called florets! I am quick, I tell you.)

There's cilantro and parsley, too (that's some rogue parsley twined in amidst the snow pea plants), and within the next week or so I can probably start picking leaves of romaine lettuce to make dinner salads with. There's a little bit of spinach, but not enough to do anything with yet. I've put some heirloom tomato seeds in the ground, as well as a few zucchini and cucumber seeds; might be too early for them, so I'm holding back about two-thirds for planting over the next month or so.

Not all of it will work out for me, of course; I'm very much a seat-of-my-pants gardener. I throw seeds around sort of willy nilly, and see if and where they'll grow. I'll mulch when there's stuff around me to mulch with, but often there isn't, and I watch helplessly as the ground bakes my plants into nothingness in the summer. Or maybe I'll get a few tomato plants to grow, but then the horn worms will find their way to my little patch of earth, and that'll be the end of that, because I don't really know how to keep them horn-worm safe.

Still, from March through October, more or less, there will be--on a pretty regular basis--stuff on my table that came from my garden. And as the various veggies, fruits, and herbs make their way from one place to the other, I'll share the recipes I use to show them off to their best advantage. Or, more likely, ask you for your favorite ways to prepare the things you grow.

I can't wait to hear what you have to share.

My garden. It's what's for dinner.

Thursday, December 24, 2009

Roasted brussels sprouts


I feel sorta bad. I mean, here it is, Christmas Eve and all, and here's me, the Jew of the group, up to bat.

Truth is, although we don't celebrate Christmas as "our holiday," Baroy and I (and the kids, once they arrived) have spent every single Christmas since 1994 with two of our closest friends. Over the years we've developed a list of must-not-deviate-from traditions, several of them involving food. And so, tomorrow night, we will feast on eggplant parmesan made with home-made sauce that is to die for. (Plus, I might make some latkes, since our friends didn't get any this season. And maybe even a little applesauce to go with. But that's a whole other holiday...which has already passed!)

Here's the problem with my trying to share that menu: Marc makes the eggplant, and Glen makes the sauce, and I have neither recipe on hand. I'll get them; I promise. But for now? You get brussels sprouts.

Now, I realize that sounds awfully Scrooge-y. I mean, there you are, visions of sugarplums dancing in your heads, having spent weeks on end baking scores cookies and pies and figgy pudding, and here I am, pushing veggies.

Trust me on this one, though. World's simplest recipe. World's most delicious veggies. We're eating them twice a week here (although by "we" I most certainly do not mean N, who eats nothing green, even going so far as to refuse Granny Smith apples). Em, who only recently refused to even smell brussels sprouts, now requests them. Frequently. The other night, while waiting for dinner to finish cooking, we ate them like popcorn, straight out of a bowl, as delectable hors d'oeuvres, giggling in delight the whole time.

Besides, you know you need something green to put on the table, if only for color balance in the family photos.
Roasted Brussels Sprouts

brussels sprouts (as many or as few as you like, depending on how many people will be eating them)
salt (I prefer Kosher salt for most of my cooking, and this recipe is no exception)
olive oil

1. Preheat oven to 400.

2. Wash and pat dry the brussels sprouts. Trim the stalk end of each sprout, and remove any dirty or discolored outer leaves. Cut each sprout in half.

3. Place cut brussels sprouts in plastic baggie; pour in enough olive oil to coat the brussels sprouts you've prepared, and add in a generous amount of salt. (I like my brussels sprouts a bit salty; you may want to be less generous.)

4. Line a cookie sheet with parchment paper, then pour oil-coated brussels sprouts out of plastic bag. Place them in single layer, cut side down, on the parchment.

5. Roast (or is it bake, since it's on a baking sheet? I really need to learn my cooking terminology) for 10 to 15 minutes. You want them to get really, really brown on the bottom, and even for some of the outer leaves' edges to burn a little; this seems to caramelize the sugars in the sprouts, takes any bitterness out, and makes them taste more than a little bit like toasted veggie marshmallows. (Don't believe me? Try 'em.) Serve.

Like I said: Couldn't be simpler.

For those of you who are brussels afficionadoes, I'm sure this is all old hat to you. In fact, you're probably saying, "Oh sure, TC, those are nice, but you've gotta try my favorite brussels sprout recipe." And I do gotta try it. Which means you have to leave me the recipe. In the comment section, below. And thank you.

Merry Christmas to all of you who celebrate. Can't wait to hear all about your day!

Friday, December 4, 2009

Guest post: Vietnamese grilled pork with rice vermicelli

My kids call this scrumptious all-in-one meal "Vietnamese pork bowl." It's a crowd pleaser: gluten and dairy free, vegetable gateway for picky eaters, straightforward preparation, and its three-hour process is done in spurts with lots of interstitial free time to pull apart brawling children—and oh my goodness is it delicious. Even my picky son with autism can be coaxed into nibbling on one of the carrot sticks. I hope you like it as much as we do.

Serves 4 - 6

Marinade
8 cloves of garlic, pressed or minced
5 tbsp fish sauce
1/4 cup sugar
ground black pepper to taste

Sauce (nuoc cham)
1/4 cup sugar
Juice of 1 large lime
5 tbsp fish sauce
1/2 cup water
2 cloves of garlic, pressed or minced


2 pounds pork shoulder (pork loin works but compromises awesomeness)
8 oz rice vermicelli/sen mee/maifun
1 medium carrot, peeled and julienned
1 small cucumber, peeled, seeded, and julienned
5 tbsp cilantro, Thai basil, mint (any combination), chopped


  1. Place pork in the freezer for sixty minutes to firm it for slicing. (Frozen pork can be slightly defrosted in microwave and sliced immediately).
  2. While the pork is freezing, mix the marinade ingredients and set aside.
  3. Remove pork from freezer, cut into 1/4" slices, then place in a gallon ziploc bag.
  4. Pour marinade into pork bag, shake to cover all surfaces, squeeze out excess air, and seal. Marinate in fridge for one hour (you can leave it overnight, but one hour is sufficient).
  5. Mix the sauce ingredients together and put in fridge until needed.
  6. Julienne carrot and cucumber, and chop herbs.
  7. Optional: Place leftover mint, cucumber, or lime in a pitcher of ice water to impress any guests or soothe yourself with a spa-like visual.
  8. Optional: Reserve a couple of carrot sticks and tell your child with the self-limited diet that they will get a bite of cookie or other preferred food for each bite of said carrot sticks.
  9. When the pork has 30 marinating minutes left, boil a large pot of water. Add the vermicelli/sen mee/maifun noodles and cook for 2 to 4 minutes, until tender. Drain the noodles, rinse, and set aside.
  10. Fetch the pork. Grill it until it is cooked through but not overcooked, 5 - 10 min. (This is an excellent time to deep-six any fantasies about Viking ranges with built-in grill tops, as they require two hours of cleanup. I recommend a nice grilling pan, Weber, cast-iron skillet, or George Foreman-style plug-in grill.)
  11. Divide up and pile noodles in individual bowls; top with vegetables, then pork, then herbs. Ladle sauce/nuoc cham over each bowl. Those who can take it should top with chili paste or Sriracha.
  12. Enjoy everyone's exclamations of pleasure and delight.

    Adapted from Serious Eats
    ---
    Guest blogger Shannon Des Roches Rosa serves a hot home-cooked dinner six days out of seven, if you include take-and-bake Costco pizza on Wednesdays.


    Monday, November 30, 2009

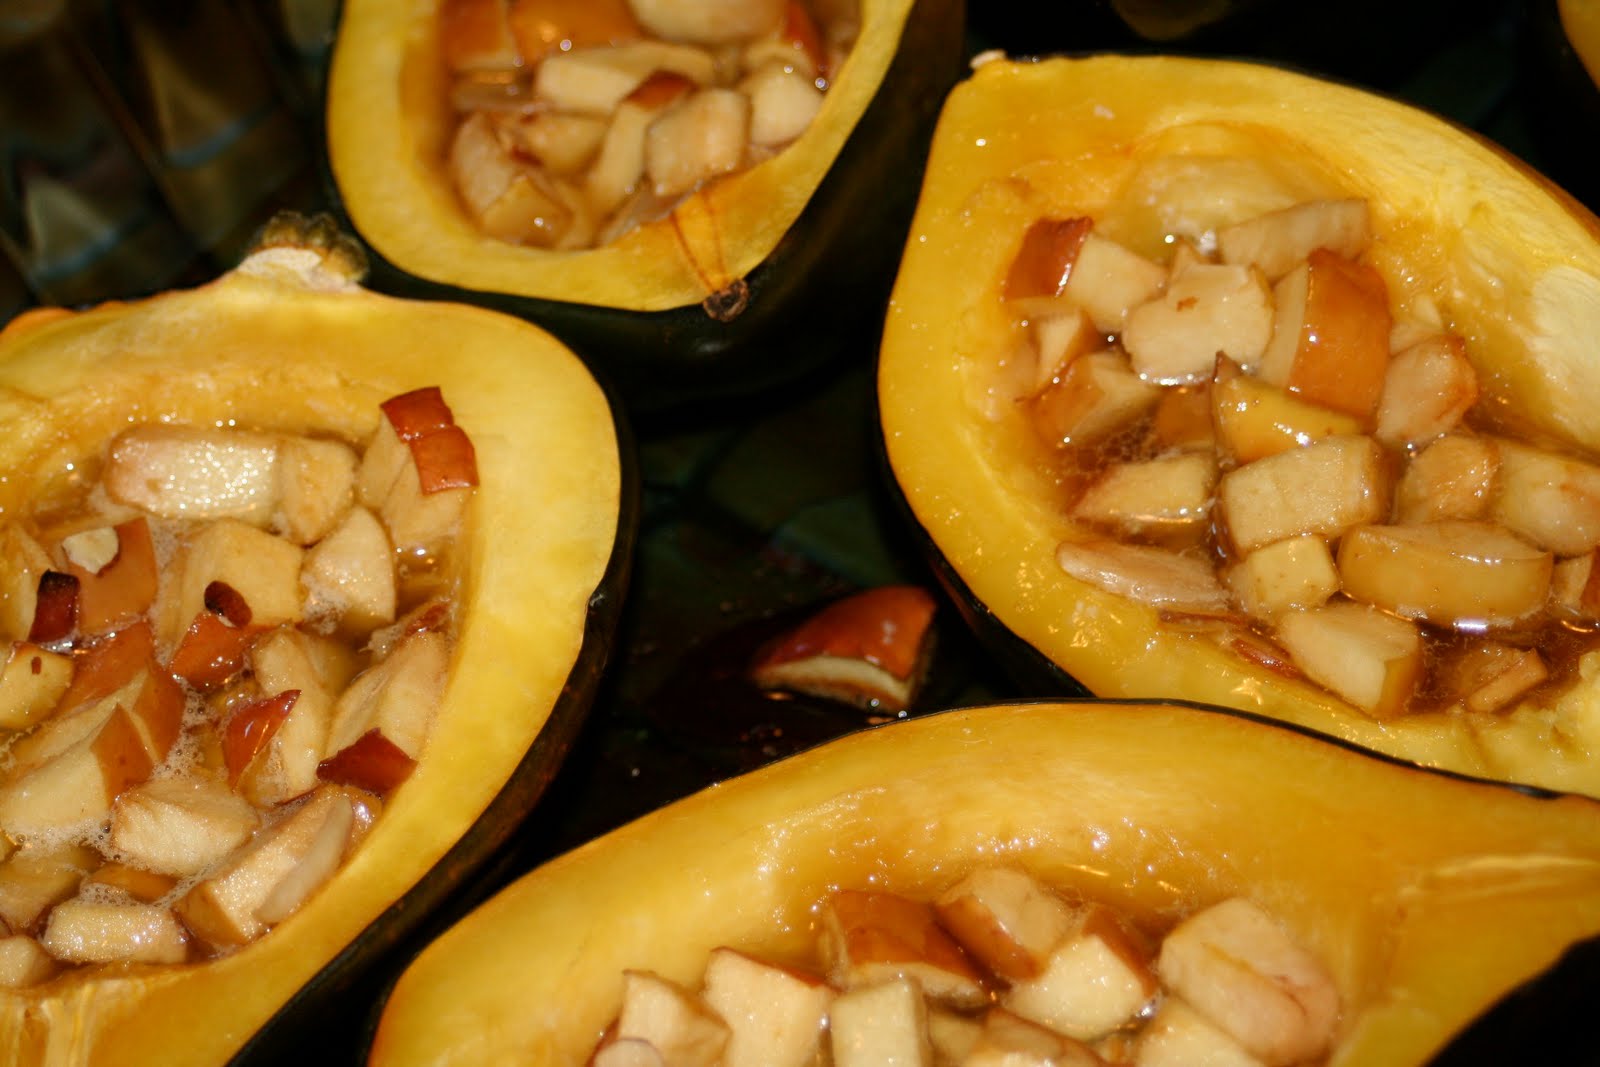
    Acorn squash with apple stuffing

    I really love squash. So when I was looking for something to replace sweet potatoes at our Thanksgiving table this year, I decided to go with acorn squash. It's not that I don't like sweet potatoes, I do. But the thing about Thanksgiving is this: the turkey is a given. The stuffing, a must-have. So when it comes to the other sides, I like to change things around from year to year.

    This recipe was really easy to execute and it's certainly one that can be improvised depending on what you have on hand. It was delicious with the turkey, but I also think it would pair nicely with pork. Here's what you need to get started:

    2 acorn squash
    2-3 apples, chopped
    approximately 3-4 tablespoons of brown sugar (depends how sweet you want it)
    dash of cinammon
    dash of nutmeg
    small handful of sliced almonds (or nuts of your choice)
    butter

    Wash the squash and then cut each in half, lengthwise. Scoop out the seeds and fibers.


    Place the squash face down in a baking dish that has about an inch of water in the bottom. Bake at 400 degrees for about 30 minutes.


    While the squash is baking, wash and chop the apples. Stir in the brown sugar, cinnamon, nutmeg and nuts. Set aside.


    When the squash come out of the oven, turn them over and fill with the apple mixture. Top each with a pat (or two!) of butter and return to the oven for another 30 minutes.


    Enjoy!


    Printfriendly